
API docs previews with Redoc and Netlify
OpenAPI in a GitHub repo
API documentation using OpenAPI assumes a docs-as-code workflow, and so does this post. You should have an OpenAPI description in a GitHub repository, so that when the description changes, the documentation can update. The big win here is that by adding preview builds for all pull requests, incoming changes can easily be shared and reviewed by all stakeholders, without any need to read YAML.
Tip: there’s no need to bundle the OpenAPI description to a single file, Redoc will follow references across files as needed so this approach is ideal for the during-development-and-review phase of the process.
Configure the Netlify project
The basic process, for Netlify or any equivalent, is to link the GitHub project to a deployable project so that updates run every time the repository updates. Netlify needs to know how to build the project, which in this case is generating the documentation as HTML, and what to publish. There’s a setting for “do this for pull requests as well” which is what makes the whole thing seem like magic!
Get started with the “Add new site” option and choose “Deploy with GitHub”. You may need to link your Netlify account to your GitHub account and/or the project you want to use if you haven’t used these tools together before or if you grant access on a per-project basis. Once that’s done, pick the project to generate API documentation for.
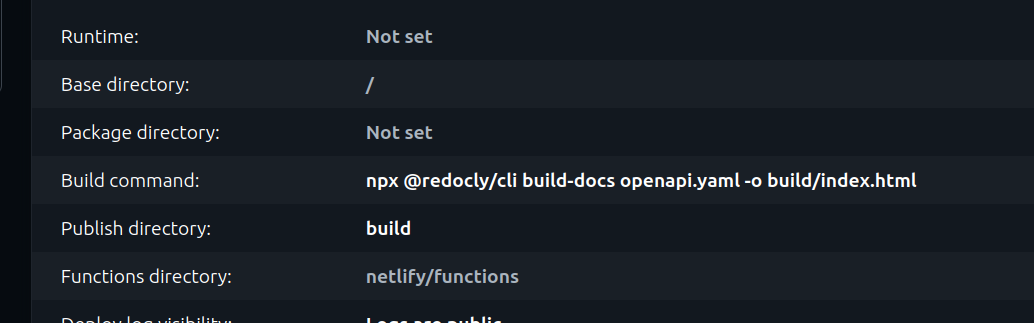
The next screen sets the site configuration. My project has openapi.yaml in the root folder, and my settings are like this:
* The build command is npx @redocly/cli build-docs openapi.yaml -o build/index.html.
* And publish directory is set to build/ since that’s where the previous command writes the files to.
Save the settings and the project will (hopefully) deploy successfully – don’t look away, it’s fast!
I’m not sure when Netlify started enabling preview deploys by default but that’s the behaviour in my most recent new site. Test your own setup by making a small but identifiable change to your API description, committing the change to a branch, and opening a pull request. After a few minutes the Netlify bot should comment with a link to the preview of the updated documentation.
All in all, the time investment to get a basic documentation rendering is definitely worth it (and if you need something more then I think I am contractually obliged to suggest you check out Redocly for the rest of the products). Investing in every stage of your API pipeline, from linting, to enrichment, and to docs – delivers rewards. And delivers them every time you make an API description change!
Hopefully you found this useful, I’d love to hear if you set this up yourself, or if you can share equivalent setups for other platforms so that others can learn from your wisdom: add a comment!