Yearly Archives: 2013
Joind.in at the PHPNW Hackathon
Changing Content Type with Slim Framework
        $response = $app->response();
        $response->header("Content-Type", "text/javascript");
The $app variable is the Slim\Slim instance for your application, once you have that, you can just add on any headers you need to with this call to header(). It wasn’t obvious to me and there weren’t a lot of resources for this, so I thought I’d share!
Simple Video Editing on Ubuntu
Graphical Video Editing
For most people, it probably makes sense to use a graphical video editor, such as KDEnlive, OpenShot or Pitivi. I tried the latter two and found them sufficiently crashy that I was unable to get a video out of them that I could play back. This might be a result of my total lack of knowledge of, and respect for, containers, codecs, and … really whatever else I needed to know and didn’t. I presume the crashiness was me doing something wrong as I know that others do use these tools successfully.
I’m also a commandline sort of person. I have difficulty in using a pointing device for any length of time, and I found that I was able to capture the videos tightly enough that I just needed to glue them together rather than actually edit.
Ffmpeg
Ffmpeg is a commandline linux tool that is the biggest swiss army knife of video tools you have ever seen. There’s just one problem: on ubuntu, the program called ffmpeg is actually an alias for avconv, which is a fork of ffmpeg that is missing some key elements, such as the ability to concatenate videos. The upshot of which is that I downloaded and compiled my own copy of ffmpeg for this project. Once I had that, things got easier :)
I used this guide to get my ffmpeg tool and all the dependencies set up: https://trac.ffmpeg.org/wiki/UbuntuCompilationGuide
Ffprobe
Ffprobe is a tool that looks at a video file and gives information about it. One thing that I found about combining videos is that matching resolutions and encodings are really important – sometimes you can create what looks like a valid output file, only to have it unable to play in some players. To use it:
ffprobe video.mp4
I found this very useful, so I thought I’d add a note about it here. I tested my videos in VLC, it seems a bit less tolerant than the standard gnome player, so it was a good way to check if the videos would play. There’s also a simpler version of VLC that shows fewer controls: cvlc (I found it handy).
Combining Videos with Ffmpeg
Once I had the genuine version of ffmpeg compiled, I used that to combine my videos. First of all, I created an input file which contained a list of videos. Here’s an example of my
input.txt
file:
file 'wireshark1.mp4'
file 'wireshark2.mp4'
file 'wireshark3.mp4'
file 'wireshark4.mp4'
file 'wireshark5.mp4'
file 'wireshark6.mp4'
file 'wireshark7.mp4'
(can you guess what this was a video of?)
Then I used the following command to use this input file and create a resulting video of these videos played one after another:
./ffmpeg -f concat -i input.txt -c copy wireshark-demo.mp4
This can look successful and still produce a bit of a strange video if all your video files aren’t precisely the same resolution and format, but I was able to get results pretty quickly once I knew I had to get those things right in recording. The time spent planning the videos paid back several times over, as it was easy to just recapture one piece of the sequence if the need arose.
Ffmpeg is a beast, powerful but superbly complex, and it was tough going to find the commands I needed even without the “wrong” fork of the project being the default with ubuntu! Hopefully this post will remind me next time what to do, and if it helps you too, then awesome :) Feel free to leave additional tips and tricks in the comments.
Generating HTML from Markdown with Pandoc
My swiss army knife of document formats is a program called pandoc. It’s absolutely fabulous, powerful, and not too complicated if you don’t need to do anything too complicated. It will guess input and output formats from file extensions, or you can be more specific if you need to. Today’s command looks like this:
pandoc article.md -o article.html
You won’t be surprised to hear that this command takes a file called article.md which contains my markdown, and outputs a file called article.html containing the HTML. I also use this to convert between all the various text markups, HTML, but also PDF and office document formats – it’s a very comprehensive tool!
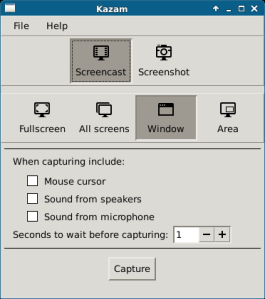
Screencasting in Ubuntu: Kazam
On an ubuntu platform, I’ve had a few false starts with video over the years, and mostly avoided it. But now my “Debugging HTTP” talk really does make more sense if you can see the process of something broken, what the tools show, and how to understand that information and fix the problem.
Kazam
Homemade Kitchen Shelves
Accurate Ubuntu Window Sizing with Wmctrl
wmctrl, a very nice linux tool that can do all of this for me.
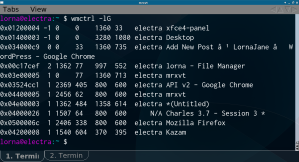
I’m aiming to have a series of windows all sized at 800×600, and the first step is to look at a list of windows in wmctrl:
wmctrl -lG
The -l switch provides a list, and the -G switch shows the geometry of the windows. This is especially useful if you want to place something on a second monitor, you can look where a correctly-placed window would go and then use those co-ordinates! Also beware that windows positioned at the origin of a desktop space rarely end up where you expect them to go.
To set a new geometry for a window, we use the -e switch to specify what that should be. The format is:
"gravity, X, Y, width, height"
For gravity, try zero. X and Y are the co-ordinates of the top left hand corner of the window, and width and height hopefully you can guess. It’s also acceptable to pass -1 for any of these values for the window to retain its current setting.
To specify a window, we use the -r switch to indicate to wmctrl which window wants the resize. You can give the title of the window, or the identifier shown in the list output, but I found it most useful to use the special value ":SELECT:" and then just click on the window I wanted to affect. Therefore the command I used the most became:
wmctrl -r ":SELECT:" -e "0, -1, -1, 800, 600"
As a final tip, make sure (by resizing the window to something definitely smaller than the desktop it is on) that the window is not maximised – if it is, it will stay that way and you will wonder what you are doing wrong.


