I discovered that this plugin is now available through apitude – simply install the package openoffice.org-presenter-console and it should all work splendidly! I use the presenter console when I am speaking (which is quite often) to show the time and the upcoming slide, its a great tool.
An iPhone App for Joind.in
My boyfriend Kevin was thinking of developing an iphone app, mostly to find out more about the technology, and I suggested he take a look at the API for joind.in and consider building something on that. The joind.in project belongs to enygma, a.k.a. Chris Cornutt from phpdeveloper.org and he has the code available on github – so we grabbed it. The API wasn’t previously used by much so we were able to tidy it up a bit and then consume it from the iphone to suit our needs. Chris has accepted my alterations to his existing project with grace – even when I’ve totally broken the live site with them!!
The joind.in site is a classic MVC setup and the API already existed within the application. It is implemented with a separate set of controllers for the various actions supported by the API, which all inherit from a controller which handles the output formats etc for the XML and JSON responses. It isn’t the world’s best API but its perfectly sufficient for the task at hand – I intend to write some examples for using it but until then you can read this post from Derick about how he used the joind.in API to pull in comments on his talks onto his own site.
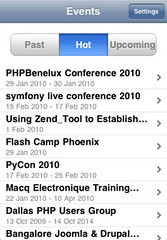
The app itself has the core functionality of joind.in that an attendee would want in his pocket at an event. The events and their details are there, along with the talks at each event. Attendees can leave comments on the various talks and socials, and these can be browsed in the app as well. To give you a little taste of the app, here are some screenshots:
If you have an iphone or ipod touch and you’re attending an event any time soon, then download the app – its under “utilities” in the app store. Comments, suggestions, bug reports and feature requests are all gratefully received (no promises about fixing/implementing them but we’ll do our best!). Our app went from submission to approved in 3 days which is very fast – thanks apple!
PHP and JSON
Writing JSON From PHP
Imagine we have a multidimensional array in PHP that looks something like this:
$menu['starter'] = array( "prawn cocktail",
"soup of the day");
$menu['main course'] = array( "roast chicken",
"fish 'n' chips",
"macaroni cheese");
$menu['pudding'] = array( "cheesecake",
"treacle sponge");
echo json_encode($menu);
The output of this script looks like this:
{"starter":["prawn cocktail","soup of the day"],"main course":["roast chicken","fish 'n' chips","macaroni cheese"],"pudding":["cheesecake","treacle sponge"]}
This is pretty typical of a JSON output string – you can see the curly brackets to enclose the whole thing, then some square brackets to show the nesting levels within the key/value formats. JSON is an ideal format for many applications because it is easy to understand and debug, its quite concise, and many languages have built-in support just like PHP.
Reading JSON Data From PHP
Once we’ve serialised the string, we might want to unserialise it again – and the PHP code for that is every bit as simple as the previous example, except that we use the function json_decode() instead of json_encode(). I’ve set the output of the previous script as the input to this one:
$json = '{"starter":["prawn cocktail","soup of the day"],"main course":["roast chicken","fish \'n\' chips","macaroni cheese"],"pudding":["cheesecake","treacle sponge"]}';
print_r(json_decode($json));
This decodes the string and then dumps it using print_r() – the output of my script looked like this:
stdClass Object
(
[starter] => Array
(
[0] => prawn cocktail
[1] => soup of the day
)
[main course] => Array
(
[0] => roast chicken
[1] => fish 'n' chips
[2] => macaroni cheese
)
[pudding] => Array
(
[0] => cheesecake
[1] => treacle sponge
)
)
Note that the data isn’t identical to how it looked when it went in – JSON can’t distinguish between arrays and objects, and doesn’t retain information about data types. So its perfect for a web service where we just want to convey the information, but may be too loose for other applications.
The examples here were taken from a talk I give about consuming web services – you can see all the slides on slideshare. If you have any additions or alternatives, leave a comment!
Word Count
Counting Lines
The biggest problem with counting lines is remembering the name of the utility, since its called “word count” and not “line count”. I tend to use this for doing things like piping grep to wc and counting the lines to give me an idea of how many occurrences of something there are. I also use it to count errors in weblogs or really anything else that I could do with summarising. The syntax is something like:
grep -R TODO * | wc -l
Using a count like this is especially good for things like auditing code, where I need to know how prevalent something is – or refactoring, where I’m looking for how many of a particular pattern are outstanding. Counting lines is also very compatible with my habit of making lists in text files.
Counting Words
This is the feature that the utility was originally designed for, and as you can imagine, its pretty good at that. As with most things, this blog post started life as a text file and when I got to this point I saved it and ran:
wc -w wc_article.txt
It outputs the number of words (272) and the name of the file, which is useful if you’re giving it a pattern to match.
Word Count
Its a really convenient and versatile little program; I use it often and I hope others will find it useful too.
PHPBenelux: Recap
The conference itself was very well organised and the venue worked very nicely. I liked the hotel (I’m accustomed to London hotel rooms so European ones always seem huge), which was nice and had an English slant on breakfast since sausages were available alongside the cheese and pastries! The venue itself was just across the car park and had plenty of rooms with an open exhibition space which worked nicely – the two tracks were on opposite sides of this space so the footfall for the exhibitors was hopefully good! Full marks go to the crew:
I gave my talk “Passing the Joel Test in the PHP World” with some updates since I first gave it at PHPNW09 in Manchester. This is a nice best practices talk and although I didn’t have a lot of people in my talk, this was no surprise since Ivo was speaking in the same slot as me with his “PHP and the Cloud” talk, which I STILL haven’t seen! If you are interested my slides are here: http://www.slideshare.net/lornajane/passing-the-joel-test-in-the-php-world-phpbnl10 Thanks to my audience who were great and managed to stay enthusiastic despite my nerves and the late afternoon slot :)
Here’s to PHPBenelux 2011!
Speaking at SuperMondays
If you are attending, let me know and come and say “hi” to me on the night! I don’t know this crowd well but so far they are pretty friendly and I’m looking forward to the trip north :)
Stopping CodeIgniter from Escaping SQL
One night when I was getting exasperated with it tangling up my SQL expressions, I tweeted my frustration in the hope that I was just missing something simple. A prompt reply from @damiangostomski told me that this was indeed the case … I dug around for the API docs on codeigniter – it’s an established framework and has a good reputation. I knew it would have API docs even though I hadn’t used the framework before, and I found them:
$this->db->select() accepts an optional second parameter. If you set it to FALSE, CodeIgniter will not try to protect your field or table names with backticks. This is useful if you need a compound select statement.
That quote is from this API docs page – so a big thankyou to Damian for replying to me on twitter, and to the good people at codeigniter for adding a useful option to their framework and documenting it so nicely :)
Contributing to Projects on GitHub
Register on Github
To do anything useful I first needed to sign up for an account. Github has a range of accounts but I found that with one of their free accounts I would be able to get started and contribute to the project. This gives me a project space of my own and a user to tie all my activities to.
Set up SSH Key
In order to authenticate against the github servers, you need to set up an ssh key and give them your public key so they know you are you. You’ll then need to tell git to use this key whenever it makes contact with the github servers. I do quite a bit with ssh and ssh keys myself so I was comfortable with this step. Even if you are totally new, its still pretty straightforward and they have a great howto on github itself which will help.
I had issues with git not picking up that it needed to use a non-standard ssh key, but I found the answers in this entry on the git website. In a nutshell, set up an ssh alias, set the key in there and then use the alias instead of the actual URL when giving the repo location to git. This now works like a charm for me.
Fork the Project
Now, github uses “fork” where I might choose to say “checkout” – fork in my world means something else completely. But in this case you’re just making your own copy of the project repository. This is where you will commit your changes to and it retains its link with the original repository making it easy for anyone with commit access to that to pull in your changes. Patch files are nowhere to be seen, and although I was wary at first, this is project collaboration at its most painless, I’m impressed! Forking was relatively simple and again there was great documentation on the github site. In particular I recommend that you take the time to follow the bit about adding an alias for the “upstream” repository – this made committing my changes to the main joind.in repo really easy.
The forking instructions linked above also gave a description of how to actually use git, how to get my changes applied to my local repo, and how to push them to my remote repo on github itself.
Make a Pull Request
Once I’d fixed a few things, I was ready to push the code back to the main project so that Chris could consider it for inclusion. This is done by making a pull request from the main project page – you can add a comment about the changes you are supplying to help the maintainers to manage all the incoming patches.
Go Forth and Contribute
It was easier than I expected to get set up to contribute to a project using github, so find something you want to improve and/or be involved with, and do it. I began by fixing the docs for joind.in, which was a great place to start since it allowed me to make a useful contribution without touching the code in the first instance :)
Speaking at PHPNW February
Charlie Bag from Burdastyle
Once I’d made the pattern, I cut out the bag and followed the instructions. They have good instructions, step by step with pictures. The Charlie bag is really simple so you just zig-zag round the shape and leave the handles like that, just unfinished, which is about the only way someone with my sewing abilities is going to make anything with curvy handles :)
I’m really pleased with the result:
This was pretty simple and now I’ve assembled the paper pattern, I might make a few more :)